Felt Flowers DIY Tutorials
Making felt crafts are such a fun and easy craft project for kids and adults alike. There are some beautiful flowers that can be made out of felt, to resemble types of real flowers, or simply to add beautiful decorations around your home with felt flowers DIY.
I am very excited to share these flower tutorials with you, in which we will look at several different uses for these little cuties, as well as different types of flowers you can create. We are going to look at specific flower types, as well as some small to larger flowers, some that are loopy flowers, and others that are simple, yet beautiful felt flowers.
Are you ready to get crafting?! Let’s start this felt project by looking at different things you can do with DIY felt flowers. Then, together, you and I will walk through the process of making beautiful flowers.
What You Can Do With Felt Flowers
Gift Topper. These cute little felt flowers make adorable gift toppers. You can make a simple little flower to finish out your gift nicely and make it extra special.
Hair Clip. Making pretty felt flowered hair clips is another great use for these flowers. Adding felt flowers to your hair clips makes such an easy hair accessory, and they just look so pretty!
Flower Bouquet. You can enjoy making your own felt flower bouquets with this simple tutorial. This can be used as decoration around the house, or even for wedding flower bouquets.
Flower Crown. No matter if you are looking for a fun craft for your little one, or just looking to make beautiful felt flowers, making a felt flower crown is another great use for these little flowers.
Embroidery Hoops. Adding felt flowers onto an embroidery hoop is a fun way to display them. There are two main ways you can display them in the hoop. First, you can attach them to the wooden hoop edge and make it into a wreath. Or you can attach the flowers to the material and use the hoop to hold the design.
Bouquets. Felt flower bouquets are another fun idea for these beautiful felt flowers. You can use different techniques to make different varieties of fabric flowers into bouquets just for fun, or even for special occasions such as DIY wedding flower bouquets.
Garlands. Garlands made using felt flowers are another great way to decorate your home using these fun, yet simple flowers.
Flower Wall. You can decorate an area with homemade felt flowers, either part of your home décor, or for special event decorations.
Felt Flower Mobiles. Another easy way that these felt flowers can be used as decorations is to make them into a mobile. To do this you can use an embroidery hoop laid flat, or another kind of hoop. Then hang the felt leaves and flowers from it to make a super cute decoration.
Felt Flower Banners. Making a banner out of felt and decorating it with DIY felt flowers is a simple yet beautiful decoration.
Added to Wood Signs. Adding felt flowers to wooden signs is a great way to enhance the wooden signs.
Curtain Ties. Using DIY felt flowers on your curtain ties is another fun way to decorate the house.
Ornaments. You can also use your felt flowers as ornaments if you want to make holiday ornaments or even holiday wreaths.
Picture Frame. Another fun use for these cute felt flowers is to use them to decorate picture frames or even mirror frames.
Decorative Pillow. The final idea on how you can use these beautiful felt flowers is to decorate a pillow with them. The decorated pillow can then be used as an accent piece in your home.
Felt Flower Wreath. Making a wreath to decorate your front door, living room, or your home is a fun use for these felt flowers.
Flower Shape To Resemble Real Flowers
These beautiful flowers can be made into many flower shapes that resemble real flowers. The different looks include simple design ideas to more complicated flower ideas.
I am going to walk with you, through some of our favorite types of flowers to make, and the best part is that all you need are a just few items to make these DIY felt flowers.
What kind of felt should you use?
There are many different types of felt available at craft stores today, so which type should you choose? Usually, to make felt flowers, your best option is going to be wool blend felt sheets. These sheets come in a variety of sizes and many different colors, anywhere from 4×4 inches, to 9×12 inches, or sometimes even as large as 12×12 inches, and in every color you can imagine.
The size of the felt sheets isn’t as big of a deal, because most of these flowers are only going to need a small portion of the felt sheet. But in order to keep this an inexpensive craft, I would suggest that you shop around, and determine what the best deal is.
As far as the type of fabric the felt sheets are made from, there are a few different blends available. If you can find a wool blend sheet, these are going to be the best option for making felt flowers.
Now, let’s turn our attention to what materials you will need to have on hand, to make these felt flowers. Below are some materials and tools I recommend that you have available when making flowers from felt.
Let’s Get Making!
Materials Needed:
· Felt Sheets
· Hot glue gun
· Scissors
· Sewing needle
· Thread
· Ruler
· Pencil or marker
The overall idea and process you will follow for each flower type is similar, but how the pieces are cut and assembled will determine what type of flower you create.
Start by cutting out the petal shapes, no matter if it is a rounded petal or a pointed petal. Then use a dot of glue to make it stick and hold its shape. In some cases, you may also want to use a needle and thread to assemble the flowers.
Now, let’s jump into the step-by-step instructions you can follow to make DIY felt flowers using different techniques.
How to Make Felt Flowers
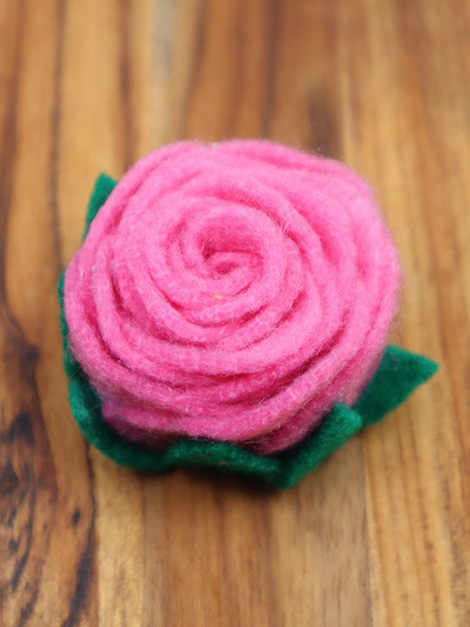
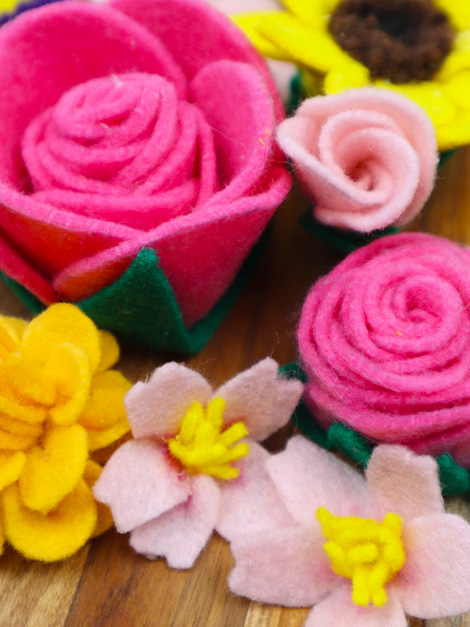
Felt Rose
Step 1: Cut 9 Circles
The first step to make a felt rose, is to start by cutting out 9 equal-sized circle shapes from the felt sheets, all in the same color:
– Cut 9, 2-inch squares
You can make these as large or as small as you want. A great starting place is to try to make the circles about 2 inches around or larger.
Step 2: Cut Each Circle in Half
Then after the circles are cut, cut each circle into two equal parts. You will then have 18 half circles that are all the same size.
Step 3: Arrange
Next, on a flat surface, lay the half circles out in a line, so that the flat side is at the bottom, and the rounded part at the top. Arrange the half circles so that they are overlapping about halfway.
Step 4: Glue or Sew
At this point you can choose to sew along the flat edge to hold the petals together, or you can use hot glue.
Sewing: To sew the petals together, you can use a basic basting stitch along the flat outer edge of the half circles.
Hot Glue: You can hot glue along the flat edge of the half circles. To do this I would recommend that you place a dab of glue under each overlapping half of the circle. Then gently press the pieces together until they are set. Repeat this process until the half circles form one long line.
Step 5: Roll into a Rose
When the half circles are attached together along the flat side, you can begin to roll the line of petals into a coil. If you are using hot glue, you can place a thin line of glue at the bottom (flat side) of the petals, that way it sticks as you roll.
Or if you are sewing the rose, after it has been completely rolled, flip it over, and sew the bottom together, so that it holds its shape.
The most important thing to remember about making a felt rose, is to try to keep it nice and even as you roll the flower up. This will give you a nice and neat finished rose.
Rosebud

Step 1: Cut 4 Ovals and 1 Circle
The first step in making rose buds is to cut out
– Petals 4 ovals 1 ½ by 2 ½ inches
– Leaf backing 1 ½ inch circle
The 4 oval shapes are all the same size and in the same color felt, and one circle in a shade of green for the leaves at the base of the flower.
Step 2: Color (optional)
Next, if you want to lightly color the top portion of the oval shapes, you can do so using a marker, crayon, or oil pastel.
Step 3: Assemble
To assemble the rosebud, you will want to take a small dot of hot glue and stick the ovals together, one at a time, so they are mostly overlapping and have an upward trend to the ovals as they are layered. Attach the first three then save the last one.
If you are attaching the flowers to the wire, you can first wad a tissue and glue it to the wire. But, if you want to skip the wire, just wad a tissue into a small oval shape. Then wrap the three oval petals around the tissue and glue them in place. Take the final oval shape and glue this over the opening. You now have a rosebud created.
To add a leaf stem, you can use the green circle that has been cut, and first, cut it into 4ths, but don’t cut all the way through. Leave the center intact. Then round out each section to form a leaf shape.
Glue the leaf to the base of the rosebud flower. Now your rosebud with leaves is created.
Chamomile

Step 1: Cut Shapes
First cut the center out of your desired color in a shape that is ¼ inch high, by 2 inches long. (about ½ cm high by 6 ½ cm long). Then, cut the color you wish to use for the petals into a circle. You can make the circle anywhere from 1 inch across to 2 ½ inches across.
– Flower Center ¼ inch high, by 2 inches long
– Flower petals 2-inch felt circle
Step 2: Glue
Then cut the center color into the strip and put a glue line on it. Carefully roll the strip into a tight circle. After the glue is dry, take a pair of sharp scissors and trim the top side of the center circle to form a curved edge. Set aside until you are ready to attach the center to the petals.
Step 3: Cut Petals
To make the petals, take the circle you cut out at the beginning. Fold the circle in half and cut about half of the way to the center on both sides. Fold the circle the other way, and repeat this process once more, you now have 4 cuts in the circle, going about halfway to the center.
Make 4 more cuts halfway between each cut, so that there are a total of 8 cuts. Round out each of these sections to create petals.
Step 4: Assemble
To assemble the flower, use hot glue to attach the center of the flower to the flower petals.
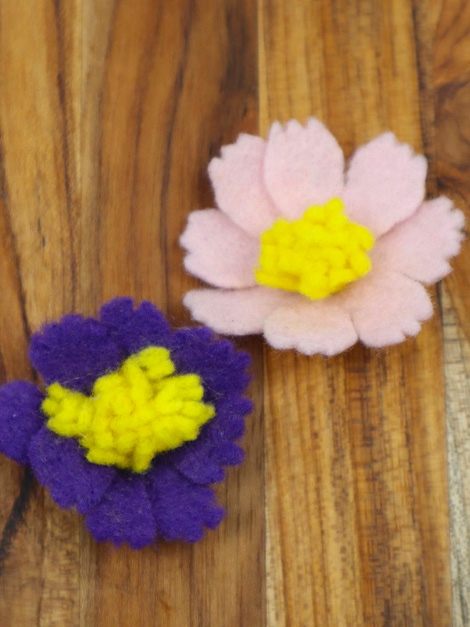
Cherry Blossom

Step 1: Cut Shapes
To start, choose the petal color, and cut out 5 squares all the same size. Then cut out a strip for the center of the cherry blossoms that are approximately ½ inches high and 2 ½ inches long.
– Flower petals: cut 5, 2-inch squares
– Center: ½ inches high and 2 ½ inches long
Step 2: Trim
Then trim the shapes. Take the strip first, and make a lot of fringe cuts on one side, that don’t go all the way through the strip, but make small slits. Try to keep them as evenly spaced as possible.
Then take the squares and round out two sides, making them into a petal shape with two pointy ends, or pointy petals. On each of the five petals, trim one edge so that it is indented, almost like a small heart.
Optional: you can color the petals if you want them to have darker tips.
Step 3: Assemble
Assemble the cherry blossom first by taking a thin line of glue along the solid edge of the long strip for the center. Carefully roll the strip into a ball, with the fringe side sticking up.
Then take each petal, with the pointy petal part at the bottom, and attach it with a dot of glue at the base of the fringed center. Repeat this process with each petal, slightly overlapping it with the previous one, as you go, until all of the petals are attached to the flower.
Cabbage Rose

Step 1: Cut Shapes
Making a cabbage rose is a little more complicated than other flowers. You will want to start first by cutting out these shapes:
– 10 circles (2”x2”) – cut in half (20 half circles)
– 9 circles (2.5”x2.5”) – cut in half (18 larger half circles)
– 1 rectangle (1/2”x3”)
– 1 large green square (2”x2”)
Step 2: Cut the Fringe
Take the three-inch long strip and cut small slits from one edge 3/4th of the way through, but do not cut all the way. Run a thin line of glue down the longest side that has not been cut, and then carefully roll it tightly together. Hold until the glue is set.
Step 3: Assemble 2 in x 2 in circles
Now, take your 2”x2” circles that have been cut in half. Divide them into groups of 4. Each group should have 5 half circles in it. Lay them out so that they are partly overlapping each other. Use hot glue to stick each group together.
Leaf Shape
Step 1: Cut Squares
Making a basic leaf shape is very simple. Start by cutting a square shape out of your desired color. The square can be as big or as little as you want it to be.
Then cut two opposite sides so that they are rounded. Leaving you with two pointy ends, and two rounded sides. Glue these simple leaves wherever you want to attach them to the flowers.
Georgia Peach
Step 1: Cut the Shapes
To make a Georgia peach felt flower, you will first want to cut the following shapes out of one color.
– 1 strip that is ½ in x 1 in long
– 2 circles
After the shapes are cut, take the two circles and cut each circle into 1/3 even-sized pieces. Set one piece aside.
Step 2: Cut the Center Fringe
Then take the long strip and cut some small fringe pieces, that do not go all the way through.
Step 3: Make the Center
Place a line of hot glue on the long side of the fringe piece and roll it into a tight circle. Use the glue to hold it in place.
Step 4: Assemble
Use a marker, oil pastel, or crayon to color the center of the petal pieces if desired. Then take the five petal pieces, and glue them one at a time to the center fringe piece, overlapping only a little.
Cosmos
Step 1: Cut Pieces
To make the cosmos felt flowers, cut the following shapes:
– A long strip ½ inch by 2 ½ inches long
– A 2-inch by 2-inch square for the petals
– And a 1-inch square out of green for the base of the flower
Step 2: Trim Flower Petals
After the felt is cut out, trim the 2-inch square into a circle. We are going to cut this circle into eight even sections, but don’t cut all the way through the circle. Rather each cut should only go about halfway to the center.
After the eight even sections are designated, use the scissors to round each section, but leave the ends of the petals flat.
Into the flat ends of each flower petal, cut two small triangle shapes out of the petals to shape them. The flower petals are now created.
Step 3: Make Flower Center
Next, take the 2 ½ inch long piece, and cut small slits from one side, all evenly spaced, and at the same depth, but do not cut through to the other side.
When the fringe is cut, take a line of hot glue along the long flat side remaining. Roll into a tight circle and hold in place until the glue is set. Use hot glue to attach the bottom of the flower’s center to the flower’s petals.
Step 4: Green Back
Make the backing of the flower by taking the green square and trimming the corners to make it into a circle. Next, divide the circle into six even sections, with small slip stitches. Take each of these sections and trim them to form a small star shape.
Glue this green star-like shape to the back of the flower to finish assembling it.
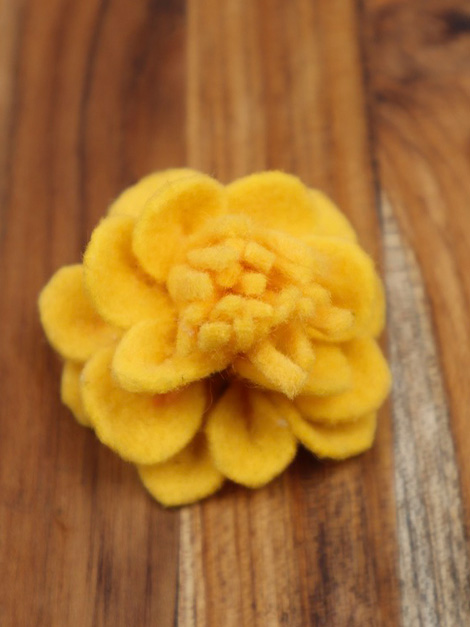
Marigold
Step 1: Cut the Shapes
To make a marigold, cut the following pieces of flannel out of the same color:
– 3 pieces which are 2-inch squares
– 1 strip that is 1 inch high by 4 inches long
Step 2: Make Center
Then take the long strip, cutting from one side, cut ½ of the way through, leaving the other side intact. Repeat this with little slit cuts evenly spaced along that one side.
When cut, take a line of hot glue along the side that is still intact, then carefully roll the strip into a circle. Press and hold, until the glue is set.
Step 3: Make Petals
Take each of the three squares and trim the corners to form circles. Once the circles are made, divide each circle into six even sections. Cut slits towards the center of the circle, to divide into sections, but be careful that you don’t cut all the way through.
Then round the corners of each section, but don’t cut much off, only round the petals out. Then cut wavey edges into the ends of each petal, making approximately three waves if you are able.
After the pieces are cut, you can add color to give them texture if desired. You can use, markers, or oil pastels if desired.
To assemble the marigold felt flower, hot glue the first petal layer to the center of the flower. Use a dot of glue at the base of the center where the center and each of the petals meet. Gently squeeze each petal to shape and give it more life. Repeat this process as you add each layer. Staggering the petals as they are added.
You can also add a green leaf as the base of the flower if you wish. This would be like creating a star-like shape when making the cosmos.
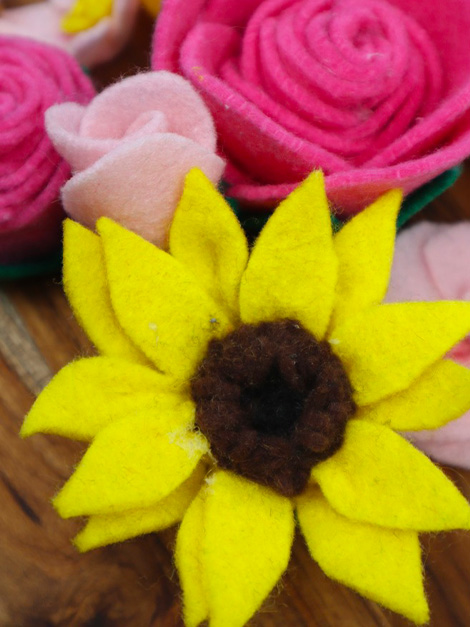
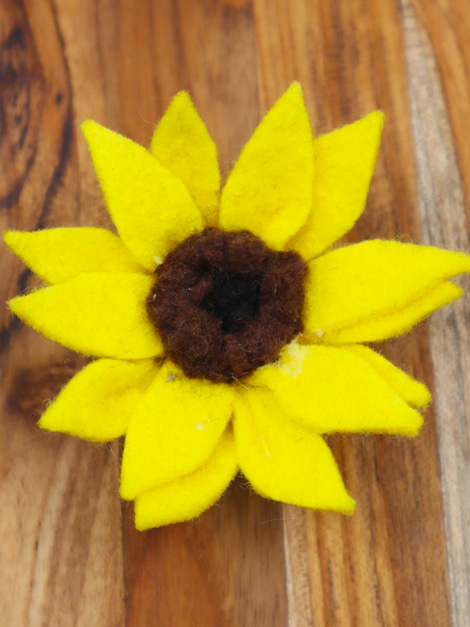
Sunflowers
Step 1: Cut the Pieces
To make a sunflower you will need to cut the following pieces.
– Petals: 1 ½ inch by 9 inches
– Leaf backing: 2-inch square
– Very center: ½ inch by 3 inches
– Outer center: ¾ inch by 9 inches
Step 2: Make the Center
After the shapes are cut out, you can begin trimming each shape. To start off, take the very center piece, and cut slits into one side so that they are evenly spaced and only go about halfway through the felt piece.
Next, take the outer center piece, and cut slits into one side of this piece as well, so that they also go about halfway deep into the piece.
Then, to assemble the center, take the very center piece, and run a thin line of hot glue along the flat edge. Carefully roll it into a circle.
Then, take the outer center piece and run a line of hot glue along the flat long side of that piece as well. Roll the outer center onto the inner center and continue to roll both into a circle. Set the center aside for now.
Step 3: Make the Flower Petals
Next, take the petal strip, and cut it into about sixteen even sections as well for the petals. As you cut, be careful to not cut all the way through this strip. The cuts should only go about three-fourths of the way through.
When the petals are cut, take the scissors and round each petal into a pointy petal shape. You can also add a small line of hot glue at the base of each petal and pinch to give the petals some character. Cut the petal strip in half so that you have two separate sections.
Use the hot glue gun to attach the sunflower petals to the center of the sunflower. Attach the second layer of petals so that they are spaced in between the first row of petals.
Step 4: Make the Green Back
Next, take the leaf backing square that was cut out in a piece of green felt, trim the edges to make a circle, and cut small slit stitches, to divide the circle into ten even sections.
Trim the corners of each section to be kind of rounded but pointed in the center of each section.
Use hot glue to attach the backing to the back of your flower.
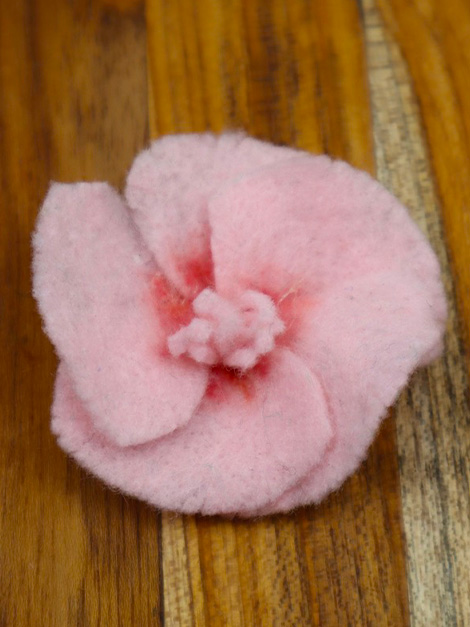
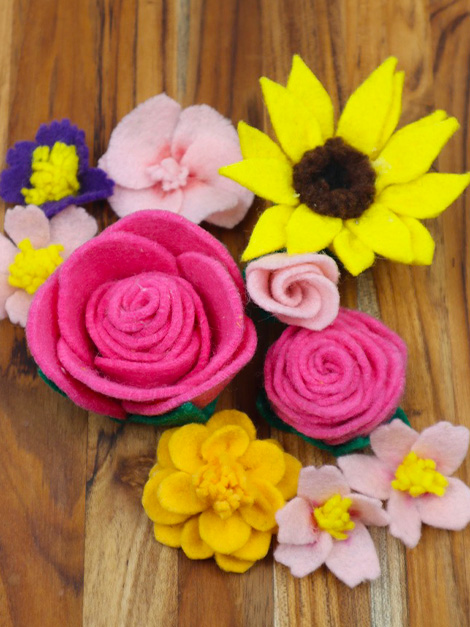
Hand-Made Blossoms
These beautiful handmade blossoms have many great uses, and they are so beautiful. This tutorial gives you the free pattern outlined in each of the flower instructions above.
Making these felt flowers is great for your personal use, or if you want to make these crafts with your kids.
DIY Felt Flowers
Making felt fabric flowers is a fun craft that is low-cost and an easy DIY project. I hope that you have enjoyed this flower tutorial and that you are ready to get started making your own felt flowers.
Happy Crafting!
Find Us Online
Be sure to follow us online on your favorite social media platform!
Be sure to check out these other craft ideas!
You Might Also Like

Felt Flowers DIY
Materials
- Felt Sheets
- Hot glue gun
- Scissors
- Sewing needle
- Thread
- Ruler
- Pencil or marker
Instructions
Felt Rose
- Step 1: Cut 9 Circles
- The first step to make a felt rose, is to start by cutting out 9 equal-sized circle shapes from the felt sheets, all in the same color:
- Cut 9, 2-inch squares
- You can make these as large or as small as you want. A great starting place is to try to make the circles about 2 inches around or larger.
- Step 2: Cut Each Circle in Half
- Then after the circles are cut, cut each circle into two equal parts. You will then have 18 half circles that are all the same size.
- Step 3: Arrange
- Next, on a flat surface, lay the half circles out in a line, so that the flat side is at the bottom, and the rounded part at the top. Arrange the half circles so that they are overlapping about halfway.
- Step 4: Glue or Sew
- At this point you can choose to sew along the flat edge to hold the petals together, or you can use hot glue.
- Sewing: To sew the petals together, you can use a basic basting stitch along the flat outer edge of the half circles.
- Hot Glue: You can hot glue along the flat edge of the half circles. To do this I would recommend that you place a dab of glue under each overlapping half of the circle. Then gently press the pieces together until they are set. Repeat this process until the half circles form one long line.
- Step 5: Roll into a Rose
- When the half circles are attached together along the flat side, you can begin to roll the line of petals into a coil. If you are using hot glue, you can place a thin line of glue at the bottom (flat side) of the petals, that way it sticks as you roll.
- Or if you are sewing the rose, after it has been completely rolled, flip it over, and sew the bottom together, so that it holds its shape.
- The most important thing to remember about making a felt rose, is to try to keep it nice and even as you roll the flower up. This will give you a nice and neat finished rose.
Rosebud
- Step 1: Cut 4 Ovals and 1 Circle
- The first step in making rose buds is to cut out
- Petals 4 ovals 1 ½ by 2 ½ inches
- Leaf backing 1 ½ inch circle
- The 4 oval shapes are all the same size and in the same color felt, and one circle in a shade of green for the leaves at the base of the flower.
- Step 2: Color (optional)
- Next, if you want to lightly color the top portion of the oval shapes, you can do so using a marker, crayon, or oil pastel.
- Step 3: Assemble
- To assemble the rosebud, you will want to take a small dot of hot glue and stick the ovals together, one at a time, so they are mostly overlapping and have an upward trend to the ovals as they are layered. Attach the first three then save the last one.
- If you are attaching the flowers to the wire, you can first wad a tissue and glue it to the wire. But, if you want to skip the wire, just wad a tissue into a small oval shape. Then wrap the three oval petals around the tissue and glue them in place. Take the final oval shape and glue this over the opening. You now have a rosebud created.
- To add a leaf stem, you can use the green circle that has been cut, and first, cut it into 4ths, but don’t cut all the way through. Leave the center intact. Then round out each section to form a leaf shape.
- Glue the leaf to the base of the rosebud flower. Now your rosebud with leaves is created.
Chamomile
- Step 1: Cut Shapes
- First cut the center out of your desired color in a shape that is ¼ inch high, by 2 inches long. (about ½ cm high by 6 ½ cm long). Then, cut the color you wish to use for the petals into a circle. You can make the circle anywhere from 1 inch across to 2 ½ inches across.
- Flower Center ¼ inch high, by 2 inches long
- Flower petals 2-inch felt circle
- Step 2: Glue
- Then cut the center color into the strip and put a glue line on it. Carefully roll the strip into a tight circle. After the glue is dry, take a pair of sharp scissors and trim the top side of the center circle to form a curved edge. Set aside until you are ready to attach the center to the petals.
- Step 3: Cut Petals
- To make the petals, take the circle you cut out at the beginning. Fold the circle in half and cut about half of the way to the center on both sides. Fold the circle the other way, and repeat this process once more, you now have 4 cuts in the circle, going about halfway to the center.
- Make 4 more cuts halfway between each cut, so that there are a total of 8 cuts. Round out each of these sections to create petals.
- Step 4: Assemble
- To assemble the flower, use hot glue to attach the center of the flower to the flower petals.
Cherry Blossom
- Step 1: Cut Shapes
- To start, choose the petal color, and cut out 5 squares all the same size. Then cut out a strip for the center of the cherry blossoms that are approximately ½ inches high and 2 ½ inches long.
- Flower petals: cut 5, 2-inch squares
- Center: ½ inches high and 2 ½ inches long
- Step 2: Trim
- Then trim the shapes. Take the strip first, and make a lot of fringe cuts on one side, that don’t go all the way through the strip, but make small slits. Try to keep them as evenly spaced as possible.
- Then take the squares and round out two sides, making them into a petal shape with two pointy ends, or pointy petals. On each of the five petals, trim one edge so that it is indented, almost like a small heart.
- Optional: you can color the petals if you want them to have darker tips.
- Step 3: Assemble
- Assemble the cherry blossom first by taking a thin line of glue along the solid edge of the long strip for the center. Carefully roll the strip into a ball, with the fringe side sticking up.
- Then take each petal, with the pointy petal part at the bottom, and attach it with a dot of glue at the base of the fringed center. Repeat this process with each petal, slightly overlapping it with the previous one, as you go, until all of the petals are attached to the flower.
Cabbage Rose
- Step 1: Cut Shapes
- Making a cabbage rose is a little more complicated than other flowers. You will want to start first by cutting out these shapes:
- 10 circles (2”x2”) – cut in half (20 half circles)
- 9 circles (2.5”x2.5”) – cut in half (18 larger half circles)
- 1 rectangle (1/2”x3”)
- 1 large green square (2”x2”)
- Step 2: Cut the Fringe
- Take the three-inch long strip and cut small slits from one edge 3/4th of the way through, but do not cut all the way. Run a thin line of glue down the longest side that has not been cut, and then carefully roll it tightly together. Hold until the glue is set.
- Step 3: Assemble 2 in x 2 in circles
- Now, take your 2”x2” circles that have been cut in half. Divide them into groups of 4. Each group should have 5 half circles in it. Lay them out so that they are partly overlapping each other. Use hot glue to stick each group together.
Leaf Shape
- Step 1: Cut Squares
- Making a basic leaf shape is very simple. Start by cutting a square shape out of your desired color. The square can be as big or as little as you want it to be.
- Then cut two opposite sides so that they are rounded. Leaving you with two pointy ends, and two rounded sides. Glue these simple leaves wherever you want to attach them to the flowers.
Georgia Peach
- Step 1: Cut the Shapes
- To make a Georgia peach felt flower, you will first want to cut the following shapes out of one color.
- 1 strip that is ½ in x 1 in long
- 2 circles
- After the shapes are cut, take the two circles and cut each circle into 1/3 even-sized pieces. Set one piece aside.
- Step 2: Cut the Center Fringe
- Then take the long strip and cut some small fringe pieces, that do not go all the way through.
- Step 3: Make the Center
- Place a line of hot glue on the long side of the fringe piece and roll it into a tight circle. Use the glue to hold it in place.
- Step 4: Assemble
- Use a marker, oil pastel, or crayon to color the center of the petal pieces if desired. Then take the five petal pieces, and glue them one at a time to the center fringe piece, overlapping only a little.
Cosmos
- Step 1: Cut Pieces
- To make the cosmos felt flowers, cut the following shapes:
- A long strip ½ inch by 2 ½ inches long
- A 2-inch by 2-inch square for the petals
- And a 1-inch square out of green for the base of the flower
- Step 2: Trim Flower Petals
- After the felt is cut out, trim the 2-inch square into a circle. We are going to cut this circle into eight even sections, but don’t cut all the way through the circle. Rather each cut should only go about halfway to the center.
- After the eight even sections are designated, use the scissors to round each section, but leave the ends of the petals flat.
- Into the flat ends of each flower petal, cut two small triangle shapes out of the petals to shape them. The flower petals are now created.
- Step 3: Make Flower Center
- Next, take the 2 ½ inch long piece, and cut small slits from one side, all evenly spaced, and at the same depth, but do not cut through to the other side.
- When the fringe is cut, take a line of hot glue along the long flat side remaining. Roll into a tight circle and hold in place until the glue is set. Use hot glue to attach the bottom of the flower’s center to the flower’s petals.
- Step 4: Green Back
- Make the backing of the flower by taking the green square and trimming the corners to make it into a circle. Next, divide the circle into six even sections, with small slip stitches. Take each of these sections and trim them to form a small star shape.
- Glue this green star-like shape to the back of the flower to finish assembling it.
Marigold
- Step 1: Cut the Shapes
- To make a marigold, cut the following pieces of flannel out of the same color:
- 3 pieces which are 2-inch squares
- 1 strip that is 1 inch high by 4 inches long
- Step 2: Make Center
- Then take the long strip, cutting from one side, cut ½ of the way through, leaving the other side intact. Repeat this with little slit cuts evenly spaced along that one side.
- When cut, take a line of hot glue along the side that is still intact, then carefully roll the strip into a circle. Press and hold, until the glue is set.
- Step 3: Make Petals
- Take each of the three squares and trim the corners to form circles. Once the circles are made, divide each circle into six even sections. Cut slits towards the center of the circle, to divide into sections, but be careful that you don’t cut all the way through.
- Then round the corners of each section, but don’t cut much off, only round the petals out. Then cut wavey edges into the ends of each petal, making approximately three waves if you are able.
- After the pieces are cut, you can add color to give them texture if desired. You can use, markers, or oil pastels if desired.
- To assemble the marigold felt flower, hot glue the first petal layer to the center of the flower. Use a dot of glue at the base of the center where the center and each of the petals meet. Gently squeeze each petal to shape and give it more life. Repeat this process as you add each layer. Staggering the petals as they are added.
- You can also add a green leaf as the base of the flower if you wish. This would be like creating a star-like shape when making the cosmos.
Sunflowers
- Step 1: Cut the Pieces
- To make a sunflower you will need to cut the following pieces.
- Petals: 1 ½ inch by 9 inches
- Leaf backing: 2-inch square
- Very center: ½ inch by 3 inches
- Outer center: ¾ inch by 9 inches
- Step 2: Make the Center
- After the shapes are cut out, you can begin trimming each shape. To start off, take the very center piece, and cut slits into one side so that they are evenly spaced and only go about halfway through the felt piece.
- Next, take the outer center piece, and cut slits into one side of this piece as well, so that they also go about halfway deep into the piece.
- Then, to assemble the center, take the very center piece, and run a thin line of hot glue along the flat edge. Carefully roll it into a circle.
- Then, take the outer center piece and run a line of hot glue along the flat long side of that piece as well. Roll the outer center onto the inner center and continue to roll both into a circle. Set the center aside for now.
- Step 3: Make the Flower Petals
- Next, take the petal strip, and cut it into about sixteen even sections as well for the petals. As you cut, be careful to not cut all the way through this strip. The cuts should only go about three-fourths of the way through.
- When the petals are cut, take the scissors and round each petal into a pointy petal shape. You can also add a small line of hot glue at the base of each petal and pinch to give the petals some character. Cut the petal strip in half so that you have two separate sections.
- Use the hot glue gun to attach the sunflower petals to the center of the sunflower. Attach the second layer of petals so that they are spaced in between the first row of petals.
- Step 4: Make the Green Back
- Next, take the leaf backing square that was cut out in a piece of green felt, trim the edges to make a circle, and cut small slit stitches, to divide the circle into ten even sections.
- Trim the corners of each section to be kind of rounded but pointed in the center of each section.
- Use hot glue to attach the backing to the back of your flower.
PIN for Later!

